Even if you are not a security professional, the Telemetry services launched by Microsoft will still blow your mind. This is because the functional spread done by Telemetry services clearly says that it aims to provide ultimate user experience and also to troubleshoot the potential risks in the future. There are some ways in order to prevent this and to come up with a solution.
Elementary services spread a plethora of information including the logos of your frequently used applications, features & files saved in the system, disclosed matrix, and a number of other figures as well. The basic hierarchies of telemetry settings done by Microsoft are distributed among the following tiers:
Table of Contents
Learn How to Fix Microsoft Compatibility Telemetry High Disk Usage
- Security – This data is only available over the enterprise installation for any specific hierarchy.
- Basic – It includes all the device information like the compatibility mode, privacy applications and much more.
- Enhanced – This includes almost every section of the services and applications. It also deals with performance.
- Full – All the other segments not covered by the three aforementioned tiers, are included in this.
What exactly is Microsoft Compatibility Telemetry?
If you are new to this world you might be confused that how could this even be an issue. Microsoft compatibility telemetry contains all the technical data and information about its hardware and software. It deals with the sharing of data to Microsoft Servers, along with updating the said data regularly.
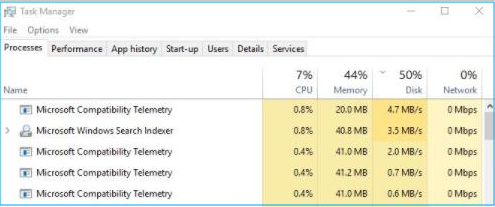
When the computer starts showing the symptoms of being jammed, gets extremely slow or even gets hanged, the one possible reason could be out Microsoft compatibility telemetry. It is a very critical parameter that consumes much of the resources such as CPU timing and disk storage. It is also a service in Windows 10 which becomes extremely slow and consumes much of the resources in the same manner. In every possible scenario, Microsoft compatibility telemetry always causes high disk usage on your computer. Across the MS operating systems, a generic executable file name CompatTelRunner.exe launches the Microsoft compatibility telemetry. This file has several other names as well like Microsoft compatibility appraiser or compatibility telemetry runner.
When an error happens in your computer, the OS automatically sends the condition and log files from your hard drive’s data or any relevant software’s technical information to the Microsoft Servers. The only benefit of this step is that Microsoft may sometimes polish the errors. All of the latent problems can also be resolved at this moment. You can also idealize that which function sends regular updates to the Microsoft only to enhance the experience of the user devoid of any fundamental error.
But, if you press Ctrl+Alt+Del then you can see how much resources are actually getting occupied by it. It is really frustrating when the Microsoft compatibility telemetry process takes large space on the Random Access Memory.
But, well it is easy to fix them by following a few simple steps and the troubleshooting will not take much time. In case you are also worried about Windows 10 Boot Loop Error then check out our ultimate solution.
Keynote: As the entire issue is related to the overloading and consumption of the resources of the RAM, all you have to do is free up some space so that all of your applications can function easily. Generally, you just need to take care of the basics. You have to keep in mind that the data has been deleted completely and there is no retrieving. Another thing is you have to disable all
the services which imply over the data. After taking care of these two major issues your problem will be solved. Detailed descriptions of the solutions are given further:
Procedure 1: You Can Use Group Policy Editor
You can follow a few basic steps under this troubleshooting and can easily fix the problem.
- Press the windows key and R together. (A run command will be initiated)
- You have to type gpedit.msc
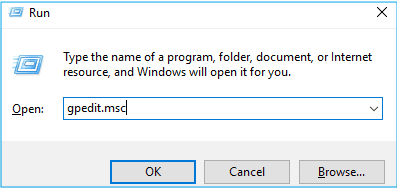
- Click on OK
- Now you have to select the following options, as you advance through the windows:
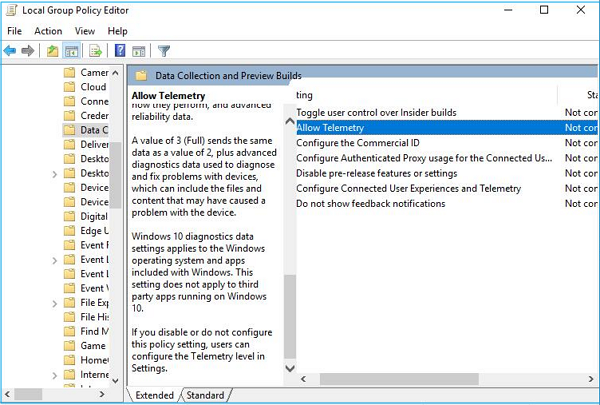
- From the Group Policy Management Console, go to Computer Configuration > Administrative Templates > Windows Components > Data Collection and Preview Builds
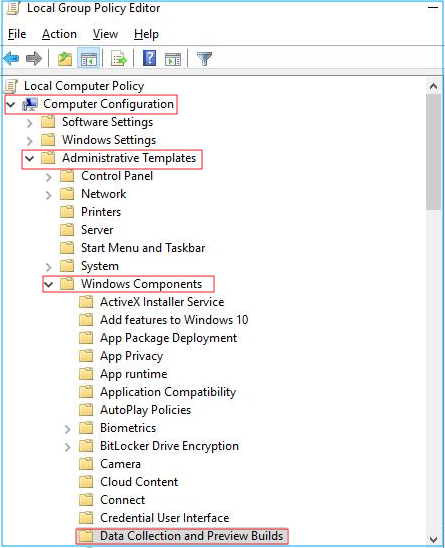
- You have to double click over “Allow Telemetry”.
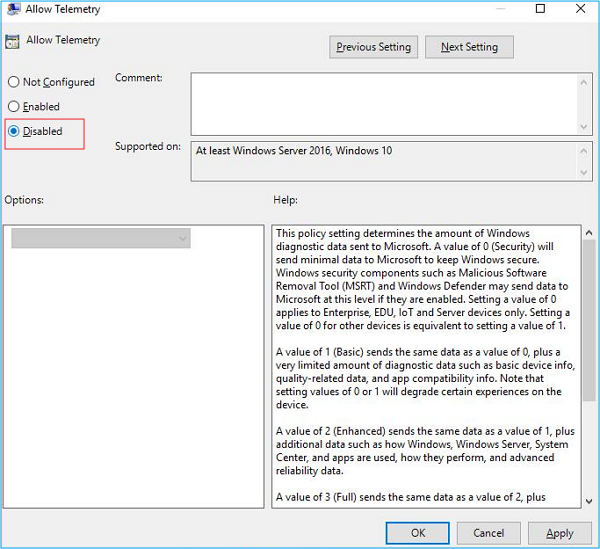
- Make a selection on “Disabled”
- Click over Apply and then OK.
- Take a follow up by pressing Ctrl +Shift + ESC all at once to open the task manager.
Now all you have to see is if Microsoft elementary initiates the normal storage or not. In case it doesn’t, you have to follow the other steps mentioned below.
Procedure 2: You Can Use Registry Editor For Troubleshooting
In case the former step doesn’t work then you can absolutely try this one without any hesitation. You have to begin with the same few initial steps. Just follow these simple steps –
- Press the windows key and R all at once.
- A run command will be initiated on your system
- You have to type ‘regedit’ in the search box.
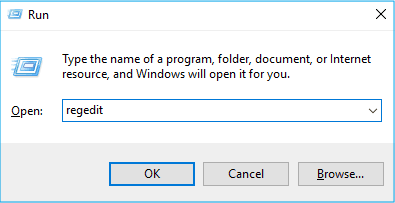
- Click on OK.
- Now go through the windows, in the same sequence as we are doing:
HKEY_Local_Machine>Software>Policies>Microsoft>Windows>Data Collection
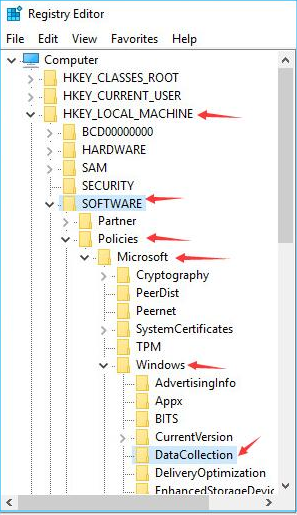
- You have to right click on Data Collection.
- Make a choice with New>DWORD which is of 32 bit in value.
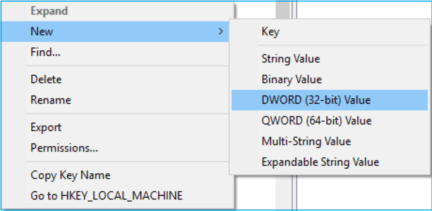
- You have to name this value as “Allow Telemetry”
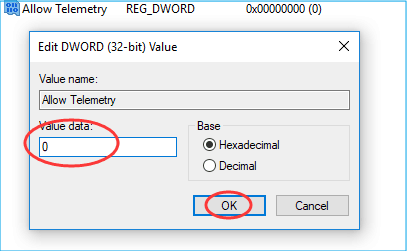
- Now you have to double click over the “Allow Telemetry”.
- You have to set the value to 0
- Click on OK.
- Now press Ctrl+Shift+ESC keys on your keyboard all at once in order to open the task manager.
You have to make this test in order to check if the Microsoft compatibility telemetry has initiated the normal storage used or not.
Trick 1: You Can Free Up Some Of The Running Memory
When Microsoft last updated their services they did replace DiagTrack with the telemetry services and user experiences. It is sometimes a little bit troublesome to disable all the connected user experiences and the same services from your Windows 10. This situation generally raises your concern regarding safeguarding the data. There is also a service named “Diagnostics Tracking Service” that usually spy over the date of every individual very specifically. It actually acts as a spy for Microsoft.
This is the most trusted and standardized way to get rid of this problem. All you have to do is clean up some memory in order to boost the speed on your computer. You can also try this tab when the others have let you down. At any instance, you can free up some memory from your computer. All you have to do is cleanup of the memory so that you can minimize the disk consumption. Take a follow through the below mentioned steps and learn how to solve the issue of speed and memory consumption over your computer. You have to start it by downloading the Clear Up Tool on your computer.
Download EaseUS Partition Master 11.10 + Crack
- Launch EaseUS Partition Master.
- Follow the system optimizations after selecting Tools.
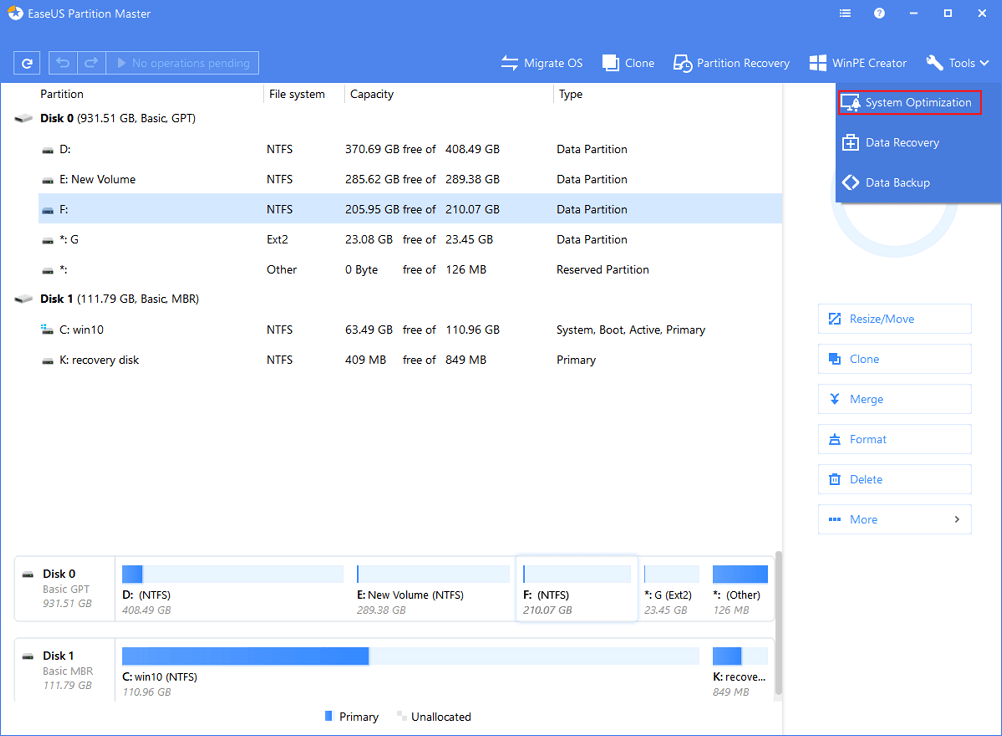
- You can search for the junk file cleanup
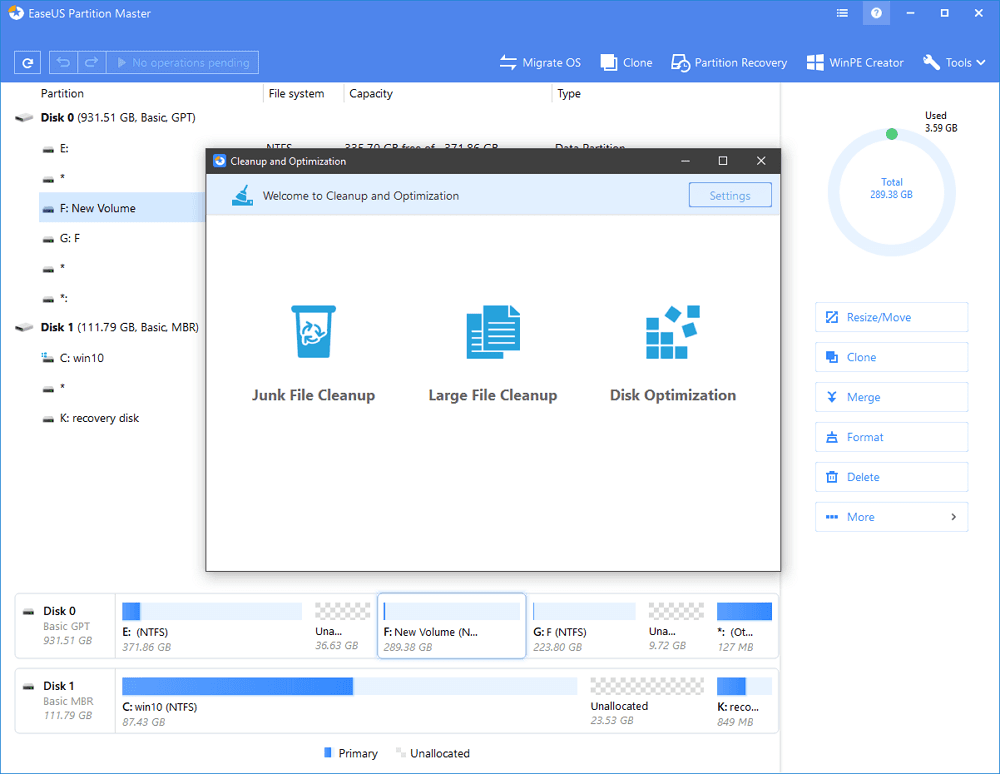
- Click over the “Analyze”
- Make a quick check over the junk files stored in your system.
- You can delete all these files from your system with a click.
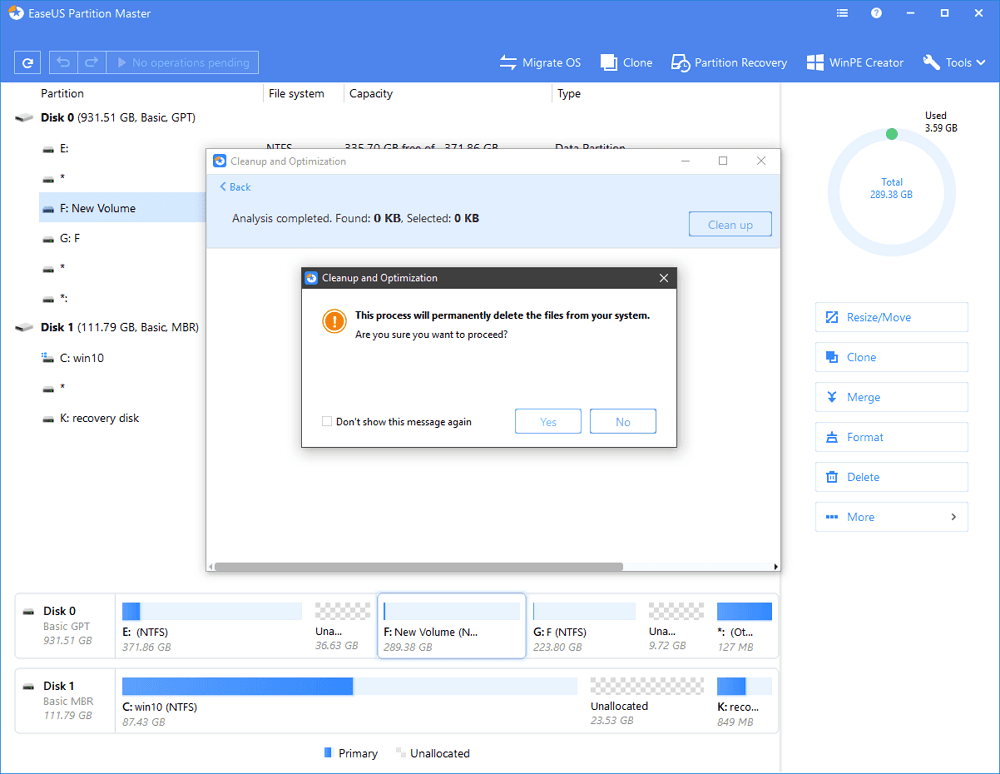
If you have finished the steps all you have to do is reboot your system. Take a follow up to the task manager and also check if the storage consumption is normal.
Procedure 3: By updating all the Drives of your Device
This is among those solutions that require more attention and it also consumes time but it is more effective and can be done when all of the other options fail. Usually, by manual or automatic methods you can easily find and download the right device drivers. Both the techniques have been discussed in detail:
Manually Downloading Drivers
You can update your device drivers by following the website of the manufacturer. Take the follow up of most updated and recent driver. The only thing that you need to pay attention is to make sure all of the drivers are compatible with the version of your Windows OS.
Automatically Downloading Drivers
In case you don’t have the resources or the time to manually update the drivers, then you can easily rely upon the automatic driver download software. Just download and install the Drivers suggested by this software, into your system. The software will make a quick scan of the drivers which need to be updated. By simply clicking over the update button, the drivers will be downloaded and installed.
Brief: It is known that the data regularly checks with Microsoft and the updates are leaked anyway. But it has been confirmed by Microsoft itself that it does not hold anyone’s data and only collect it in case the data has been sent by the user anonymously. This is also done to ensure the quality of user experience and for the Windows to perform better. Following the estimation, the operations with the data collection are done in order to improvise the functionality and overall performance of the windows 10. In a few cases, it was just the user’s concern that their data has been collected which of course provided the security concerns. Microsoft has also made available a few of the basic ways through which you can disable the telemetry services and diagnose all the data collection in your computer. The connected user experiences and telemetry are undoubtedly the functional parameters of Telemetry services.
Learn How to Disable The Diagnostics Tracking
The first step is to know what actually diagnostic tracking means.
A service where Windows automatically runs the program and sends its data to Microsoft is called as diagnostics tracking or DiagTrack. You can also call it as the actual combination of user experiences along with the Telemetry. This service actually accepts the tool after the transmission of the information to Microsoft. It is also done in order to enhance quality over the windows 10.
Procedure A: Operate the Diagnostic Data
Even this step will also be preceded in the same way. You have to follow the basic initials from the above-mentioned steps:
- From your keyboard press Windows Key and R at the same time.
- In the search box type privacy.
- Click over the Privacy Settings.
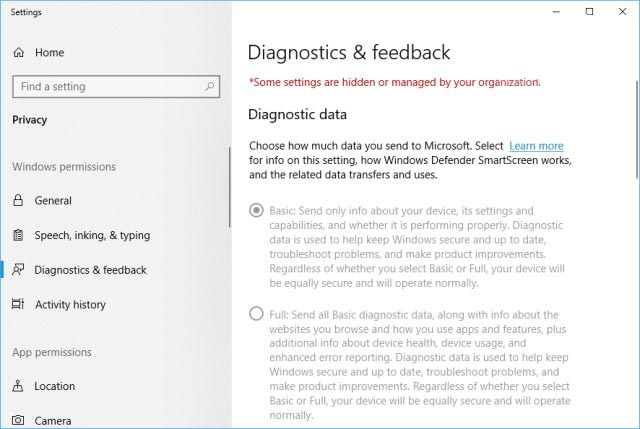
- Search for “Diagnostics and Feedback”
- You have to look for “Delete Diagnostic Data” after scrolling.
- Click on the “Delete Button” to carry out the deletion procedure.
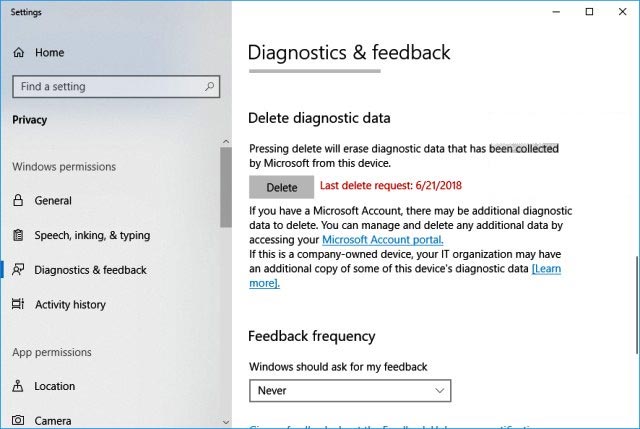
Procedure B: You have to Disable the Services
Till this step, all that you did just included the deletion of the data. Now you have to proceed by disabling or deleting the services as well so that it cannot ruin the entire process. Follow
the steps mentioned below to get rid of the trouble :
On your keyboard, you have to press the Windows key along with R at the same time.
In the search box, you have to type “services.msc”
- Now you have to double click on the “connected users experience and elementary”.
- Change the entire startup type by changing “Automatic” to “Disabled”.
- Click on ‘Stop’
- Apply this Selection and click on OK.
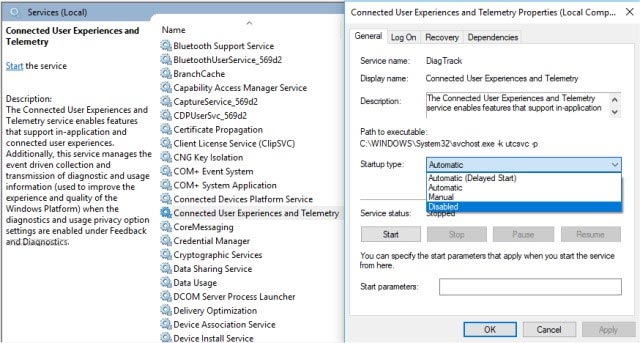
The major thing after these steps is rebooting. You have to reboot your computer in order to implement the changes.
Blame The “Bad Sector” Too
If your only concern is the slowing down of your computer, then there might be several other reasons as well. The most likely and the most common reason is a Bad Sector which is also running parallelly with the Microsoft Compatibility Telemetry.
Final Remarks
We have seen a number of solutions to overcome the problem of Microsoft compatibility telemetry. Out of all the possible ways, troubleshooting through the group policy editor is one of the simplest and finest ways to execute. Alternatively, using third-party software may also work. If you need to know how to repair windows 10 using CMD then take a follow up through this link.
You can apply these settings even if you are using any version like Enterprise, Education or IoT files for Windows 10. In this quick summary, we have tried to diagnose the trouble with Telemetry services and diagnosis with the conception of space.


